
How to Prime Your Vape Coil
If you’ve ever taken a hit from your vape only to get a burnt taste, chances are you didn’t prime your coil properly. Priming vape coil is a crucial step that ensures the coil is fully saturated with e-liquid before use. Without it, you risk burning the cotton wick, wasting your coil, and ruining your vaping experience.
In this guide, we’ll walk you through exactly how to prime your vape coil, why it matters, and how to do it right every time. Whether you’re new to vaping or a seasoned user, understanding coil priming can significantly improve your device’s performance and flavor output.
Why Priming Your Vape Coil Is Essential
Priming a vape coil isn’t just a recommendation — it’s a necessity. The coil’s cotton wick must be soaked in e-liquid before you apply any heat. When the cotton is dry and the coil is activated, it burns almost instantly, producing a harsh taste and permanently damaging the coil.
Priming vape coil helps:
- Prevent dry or burnt hits
- Extend the life of your coil
- Improve flavor quality from the first puff
- Ensure smooth vapor production
What Happens If You Don’t Prime Your Vape Coil
Skipping the priming process can lead to frustrating consequences. A dry hit, for instance, is not only unpleasant but can also leave lingering burnt residue that taints future hits — even if you change flavors.
Once the wick is scorched, it doesn’t absorb e-liquid properly. You’ll notice reduced vapor, inconsistent flavor, and a coil that needs replacing far too soon.
Priming vape coil may take a couple of minutes, but it saves you time, money, and frustration in the long run.
How to Prime Your Vape Coil the Right Way
Priming a vape coil is a simple process, but attention to detail is key. Here’s how to do it step by step.
Prepare Your Device and E-liquid
Before you start, make sure your hands and workspace are clean. Choose a compatible e-liquid for your device and get your new coil ready.
Check your coil’s specifications. Higher resistance coils work best with thinner e-liquids (50/50 VG/PG), while low-resistance coils (sub-ohm) often need thicker juices (70/30 VG/PG).
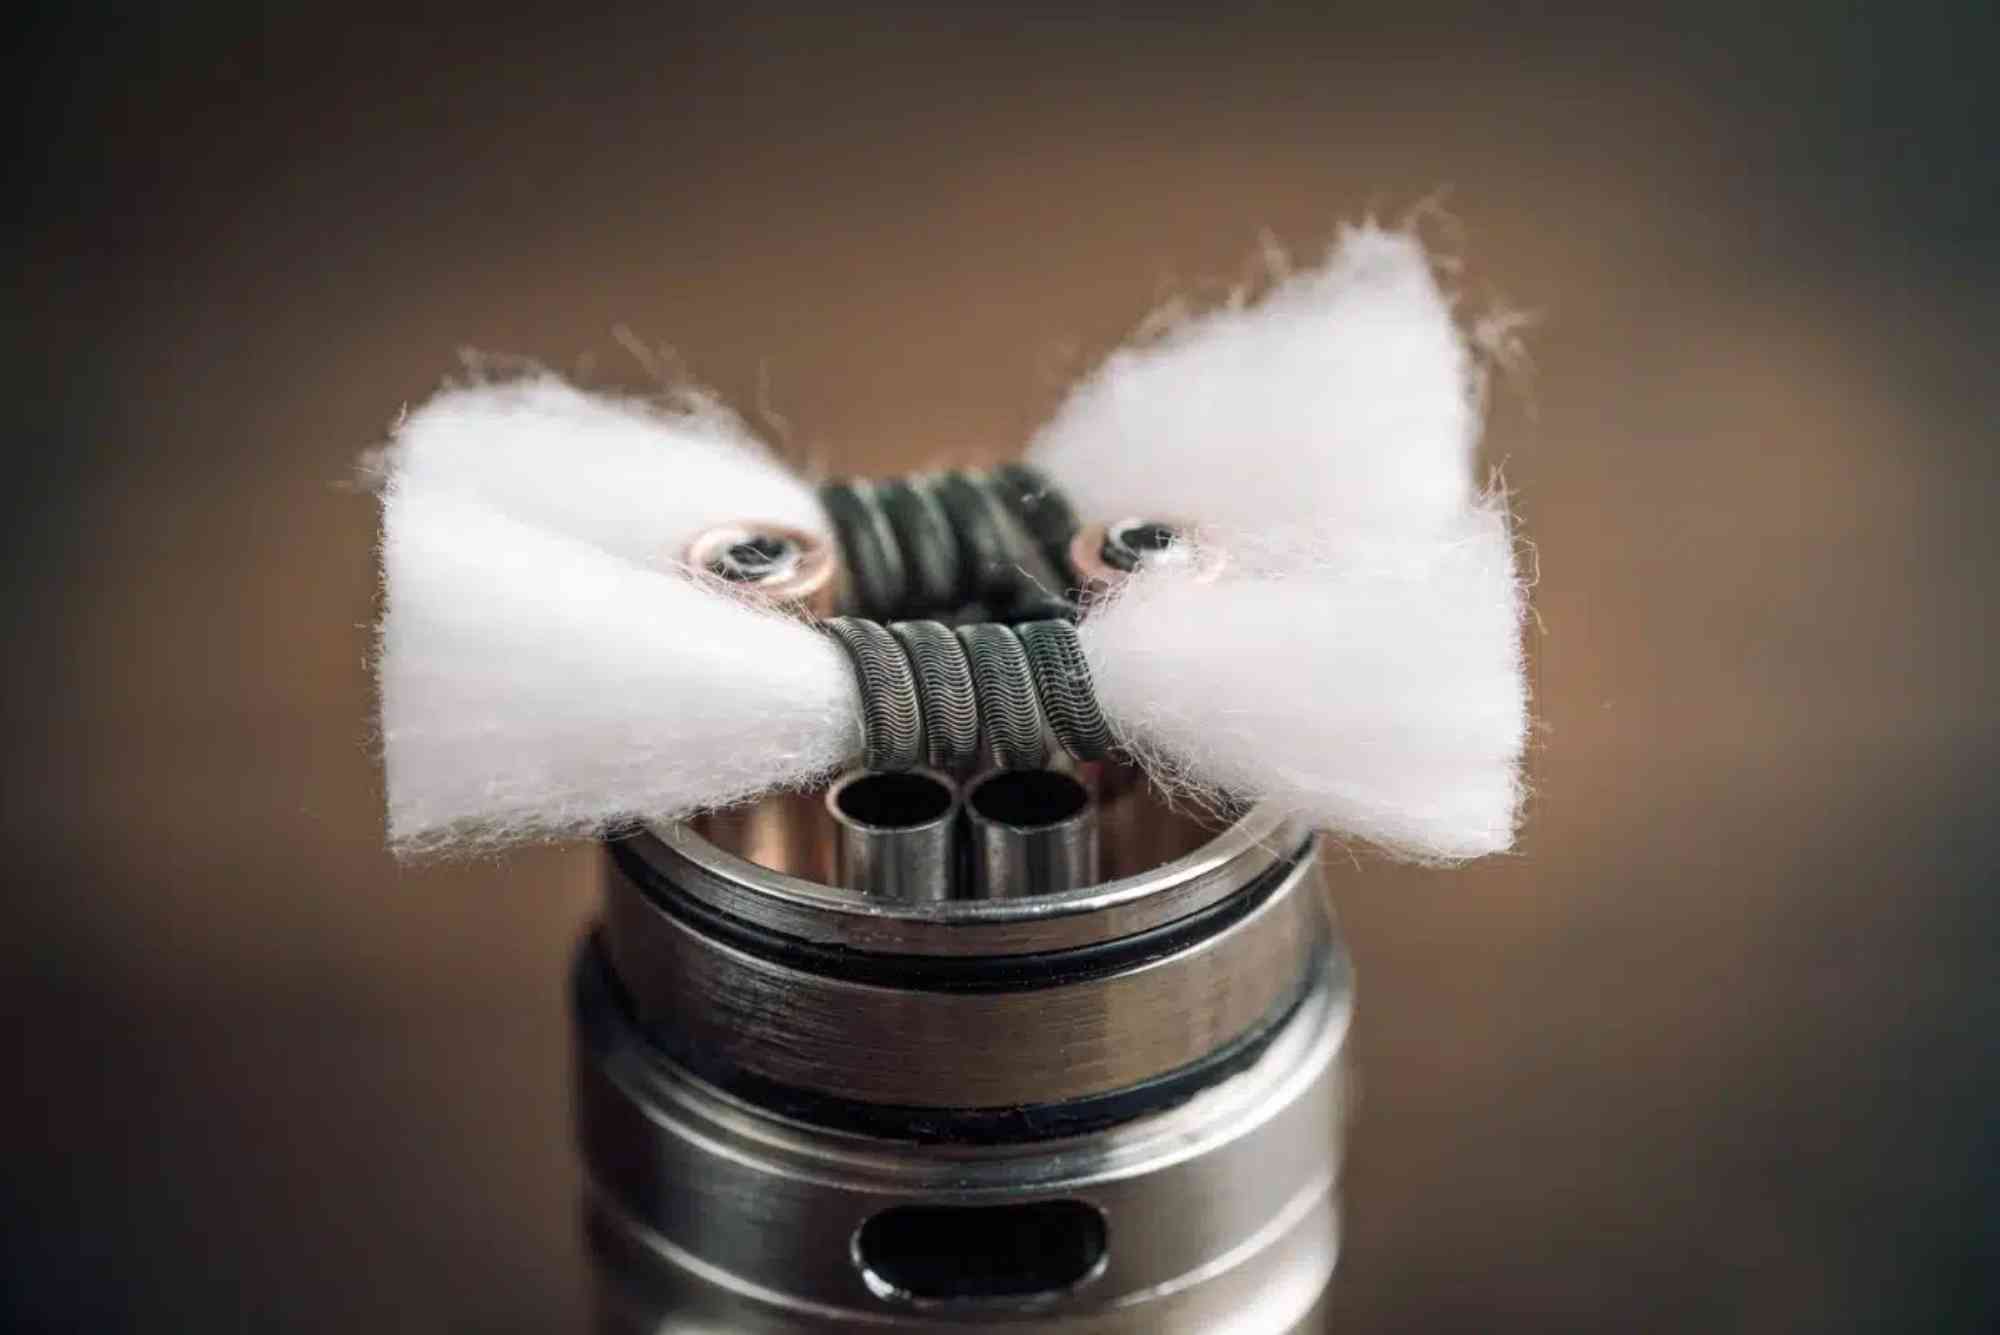
Saturate the Wick Manually
Look at the coil — you’ll see small cotton openings (called juice ports) around the side. Use your e-liquid to apply a few drops directly to these exposed parts of the wick.
Then, add a few drops right into the center of the coil head. Be gentle and avoid over-saturating. The goal is to moisten the cotton, not flood it.
Assemble the Tank
Once the wick is pre-soaked, install the coil into your tank as directed by the manufacturer. Reassemble the tank components and fill it with e-liquid. Make sure everything is secure to avoid leaks.
Let It Sit
After filling, let the vape sit upright for 5–10 minutes. This allows the e-liquid to soak fully into the cotton wick. Even with pre-soaking, this extra waiting time ensures complete saturation.
Patience at this stage pays off. Rushing the process can still result in a dry hit.
Start with Low Power
Turn on your vape device but don’t take a puff yet. Instead, set the wattage to the lower end of the recommended range for that coil.
Take a few primer puffs without firing the device (inhaling through the mouthpiece without pressing the fire button). This draws e-liquid into the coil naturally.
Now you’re ready. Fire the device and start vaping slowly. Increase wattage gradually as you go — this protects the coil and gives the cotton time to adapt to heat.
Signs That Your Coil Is Properly Primed
Once primed correctly, your coil should produce smooth, flavorful vapor from the first hit. You shouldn’t taste anything burnt or dry.
Here’s what to expect from a well-primed coil:
- Rich, clean flavor
- Smooth vapor production
- No crackling or popping sounds
- Even wicking with no leaks or dry spots
If you experience harshness or off-flavors, stop and recheck your priming method.
How Often Should You Prime a Vape Coil?
You only need to prime a new coil once — when you first install it. However, if you let your tank run completely dry or switch to a new coil after cleaning, it’s a good idea to prime again.
Also, if you’re switching to a thicker e-liquid or using a coil after extended storage, a quick re-priming can help.
Common Mistakes to Avoid When Priming Vape Coil
It’s easy to overlook minor details when you’re in a rush. But some common errors can lead to premature coil burnout.
Over-saturating the wick can cause flooding, leading to spit-back or gurgling sounds. Under-saturating will result in dry hits. Always aim for balance.
Another mistake is skipping the waiting period after filling the tank. Even if you pre-soak the wick, e-liquid still needs time to reach deeper parts of the cotton.
Starting with high wattage is also risky. Begin at a low setting and slowly work your way up to protect the wick.
Advanced Tip: Priming for Sub-ohm Vaping
Sub-ohm coils (under 1.0 ohm) require special attention. Since they use more power and produce more heat, proper priming is even more critical.
Use thicker e-liquid (typically 70 VG or higher), and be generous but not excessive when soaking the cotton. Take 3–5 dry puffs after tank fill-up and let the vape sit a full 10 minutes.
Sub-ohm setups are more sensitive, so any misstep in priming vape coil can result in wasted coils and bad flavor.
Maintaining Your Coil After Priming
Once primed, you still need to care for your coil. Don’t chain vape excessively, and avoid vaping when the tank is nearly empty.
Clean your tank regularly, and monitor flavor and vapor quality. If either drops significantly, it may be time for a new coil.
With proper priming and moderate use, your coil should last one to two weeks, depending on your vaping habits and e-liquid choice.
A Small Step That Makes a Big Difference
Priming vape coil might seem like a minor task, but it’s essential for a smooth, flavorful vaping experience. By taking just a few extra minutes, you can avoid dry hits, extend your coil’s lifespan, and get the most out of your device.
If you’re new to vaping, make priming a regular part of your setup process. If you’re experienced, a refresher never hurts — especially if you’re switching devices or coil types.
FAQs
How long should I wait after priming a coil?
Wait at least 5–10 minutes after filling your tank. This gives the e-liquid enough time to saturate the cotton wick completely.
Can I vape right after priming the coil?
No, it’s best to let the coil sit for several minutes. Taking dry puffs without firing the device can help pull in more e-liquid.
How do I know if my coil is primed properly?
If you get rich flavor and smooth vapor without any burnt taste, the coil is well-primed.
Do I need to prime coils in pod systems?
Yes, even pod systems benefit from coil priming. Add a few drops of e-liquid to the pod’s wick area and wait before vaping.
Can priming fix a burnt coil?
No. Once a coil is burnt, priming won’t help. You’ll need to replace it. Priming only prevents burning in new or clean coils.